This time, I would like to apply a little more using the Hough transformations that I have learned so far.https://m.blog.naver.com/dorergiverny/223125100475

The straightforward detection – The C++ video to the last time search – Huff conversion (Hough Transfer) Home page.I’ve made a C++… blog.naver.com
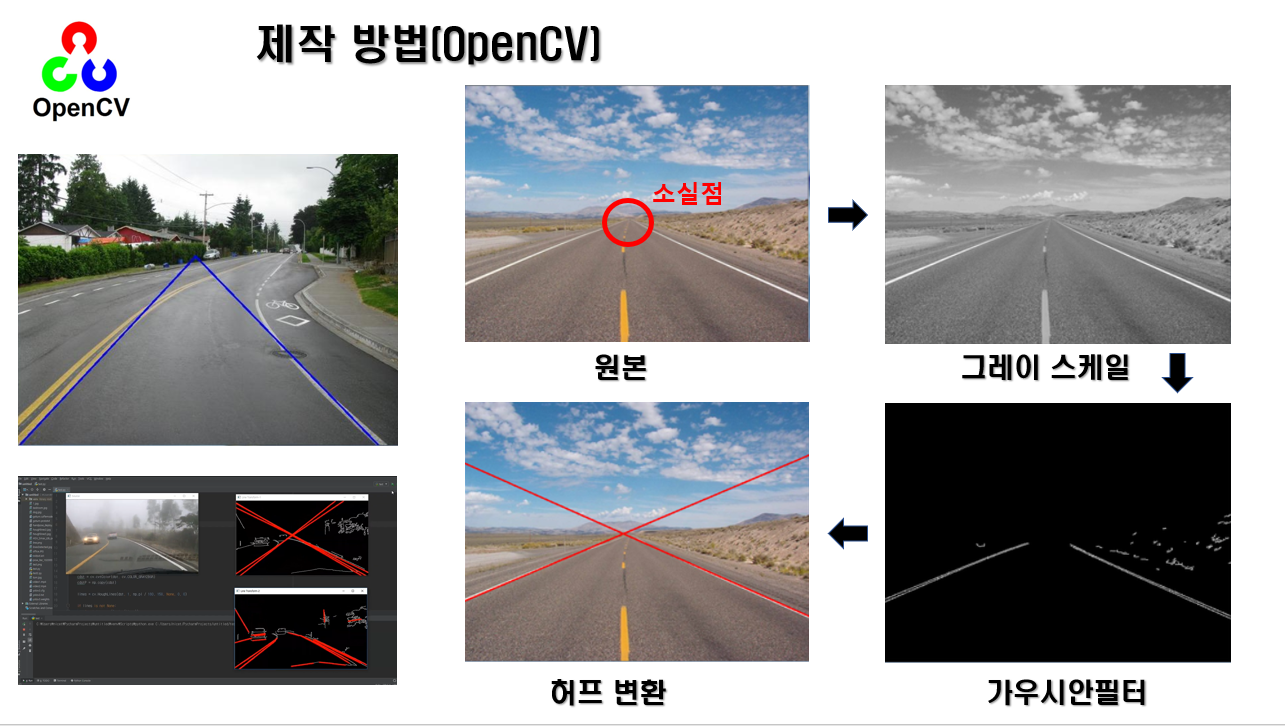
I think the field where Hough conversion is used the most is recognizing lanes through autonomous driving.I have briefly introduced Vanishing Point before.https://m.blog.naver.com/dorergiverny/223068116929
인기글


![[New Balance Story] New Balance 574 Legacy OG 4 colors release information (U574LGT, U574LGGB, U574LGG1, U574LGE1. Higher and sharper.May 5th 11:00 AM)](https://bay.sobaekmnc.kr/wp-content/plugins/contextual-related-posts/default.png "[New Balance Story] New Balance 574 Legacy OG 4 colors release information (U574LGT, U574LGGB, U574LGG1, U574LGE1. Higher and sharper.May 5th 11:00 AM)")

[C++] The equation representation theorem for straight lines – line homogenous coordinate This time, I’d like to summarize the various methods of representing straight lines or segments and the methods I recommend. 直線(···blog.naver.com

The video that we took the camera (nottele) is applied to the camera (not the Telephony) is applied.In other words, these lines are gathered in one point.It is basically applied when drawing art.And the loss point of the difference between the lines, but the line is the disappearance line (Vanning Line) is called {Vanning Line).
[UniArt] Draw with 1 point perspective~: Naver Blog (naver.com )

The following video is open, but when I had already opened the movie, but the Korean Peninsula (Hanband) when the movie.
The camera changes will change depending on how angle (Tilt) but cannot be more expensive than the King Line.I think I’m going to practice today, but I think I can see you see you in the same line.You can verify whether the linear (H Transportation) is parallel (HTransform) is parallel.But I will continue to move in a little different approach.

출처: http://egloos.zum.com/eyes33/v/6170996

If the camera is calibration, I can easily obtain this information, I can easily obtain that video from the Internet.So I would like to perform any.Use the disappearance point to detect lane from the original video.Read the source video and extract the channel.And then extract the line using the RouterP() to extract the line.

cv::Mat src = cv::imread(“../../images/Road2.png”, cv::IMREAD_COLOR);cv::Mat src_gray;cvtColor(src, src_gray, cv::COLOR_BGR2GRAY);cv::Mat src_edge;cv::キャニー (src_gray, src_edge, 170, 220); std::vector<cv::Vec4i> 行 1;cv::HoughLinesP(src_edge, line1, 1, CV_PI / 180, 200, 150, 20); (const auto&l : lines1) {cv::line(src, cv::Point(l[0], l[1])}、 cv::Point(l[2], l[3])、 cv:Scalar(0, 255)、2, 8);} 用

The results are as follows.
When I tried line fitting using the Line_t structure that represents the straight line I made before, it looks like the following.https://m.blog.naver.com/dorergiverny/223111900224

[C++] Line Fitting 方法 Summary (1) – Understanding RANSAC Robust Estimation Line Fitting, let’s look at the basic principles for Line Fitting. RANSAC은 Robust Parameter Estim···blog.naver.com[C++] Line Fitting 方法 Summary (1) – Understanding RANSAC Robust Estimation Line Fitting, let’s look at the basic principles for Line Fitting. RANSAC은 Robust Parameter Estim···blog.naver.comstd::vector <Line_t> vecLines; (const auto&l : lines1) {cv::line(src, cv::Point(l[0], l[1]), cv::Point(l[2], l[3]), cv::Scalar(0, 0, 255), 2, 8);ine_t line;ine;ine。setPoints(cv::Point(l[0], l[1]), cv::Point(l[2], l[3]));ecLines.emplace_back(line); cv::line(src, cv::Point(line.getXfromY(0), 0), cv:Point(line.getXfromY(src.rows), src.rows); cv:Scalar(0, 255));}std::vector <Line_t> vecLines; (const auto&l : lines1) {cv::line(src, cv::Point(l[0], l[1]), cv::Point(l[2], l[3]), cv::Scalar(0, 0, 255), 2, 8);ine_t line;ine;ine.setPoints(cv::Point(l[0], l[1]), cv::Point(l[2], l[3]));ecLines.emplace_back(line); cv::line(src, cv::Point(line.getXfromY(0), 0), cv:Point(line.getXfromY(src.rows), src.rows); cv:Scalar(0, 255));}Can you see the vanishing point clearly?If other lines were chosen, I think you could see other vanishing points. A slight change to the HoughLinesP() condition may result in. Lines that are not parallel do not meet at one point.Let’s ask for loss.I think that the disappearance point is now the current selected line, so you can find the following.https://m.blog.naver.com/dorergiverny/223105068154[OpenCV][C++] Get histograms from images – cv::calcHistgraph draw Now let’s look at the most important histograms in image analysis. In statistics, the histogram is … blog.naver.com[OpenCV][C++] Get histograms from images – cv::calcHistgraph draw Now let’s look at the most important histograms in image analysis. In statistics, the histogram is … blog.naver.comcv::Point2frefPoint;cv::(inti = 0; i < vecLines.size(); ++i){(intj = = 0; j < vecLines.size(); ++j){if (i == j) Mat accumulation () for Content = v_16U_16U_16U_16U_16U_16U_16U_16U_16U.crossPointWithLine(vecLines[j]);if(0 < refPoint.x & & refPoint.x < src.cols && 0 < refPoint.y &&refPoint.y < src.rows)ccumImg.at <ushort> (round(refPoint.y), round(refPoint.x))+= 1;}double minVal, maxVal; cv::ポイント minPos, maxPos;cv::minMaxLoc(accumImg, &minVal, &maxVal, &minPos);The current accumulation image has the maximum value (468,169) and if you look at that part, it may include truncation errors because it is calculated as a real value, but you can see that cumulative values are concentrated around it. Then, you can see that this is the vanishing point.This video is a beautiful one, so you don’t have to check the vanishing point because the HoughLineP() results are clear, but if you want to check if the lines are parallel later, please check the vanishing point as above. Let’s look for the center line in this original video.First, to make a mask video, we will draw only the lines extracted by HoughLinesP().cv::Mat mask = = cv::Mat::zeros(src.size(), CV_8UC1); (const auto&l : lines1) {cv::line(mask, cv::Point(l[0], l[1]), cv:Point(l[2], l[3]), cv:Scalar(255, 2, 8);} 用cv::Mat mask = = cv::Mat::zeros(src.size(), CV_8UC1); (const auto&l : lines1) {cv::line(mask, cv::Point(l[0], l[1]), cv:Point(l[2], l[3]), cv:Scalar(255, 2, 8);} 用It’s one lane, but there are two lines. You have to use morphology to match this.https://m.blog.naver.com/dorergiverny/223063911425Open CV] [C++ Technology calculation 2 – OpenC++ TechnologyExamologyExamologyExamologyExampletion of the topology EXTENSION. https://m.blog.naver.com/dorergiverny/22306382…blog.naver.comClosing must be performed in order to align the white areas.There is no need for vertical, and to close horizontally.cv::Mat element = cv::getStructuringElement(cv::MORF_RECT, cv:Size(30, 1)); cv::morphologyEx(mask, mask, cv:)::MORF_CLOSE, element);Then, it appears as follows.Now that the mask video has been made, we have to find the yellow line in the color video, right?To find the yellow line, you can extract it from the HSV image as shown below.https://m.blog.naver.com/dorergiverny/223110045599[OpenCV][C++]HSV color space conversion and examples – Specific color extraction (segmentation) This time when color video processing.3 primary primary primary primary color… blog.naver.comAfter separating src video, extract the Dell channel only after separating the value video.And then create a new mask video that made on the Dell Channel and create a new mask.The mask is used to reasoning from the original video to the Dell area, which can be obtained by using the mask.cv:Mathsv;cv::cvtColor(src, hsv, cv)::COLOR_BGR2HSV), std::::vector+cv::::::::::cv::::cv =vcvcvcvcopy To(dst, マスク);This is the result of extracting only yellow channel from Hue video,If you extract only yellow lines from the original video using the mask video, you can get the following results. A little noise can be seen, but this can be removed by additional filtering using properties such as value images. (If you can follow my lecture slowly, I can do it enough. Try it individually.)Other approaches can be taken to.First, I will transform the video and make it look like what I saw above (Bird Eye View). https://m.blog.naver.com/dorergiverny/223106225174[C++] I learned about Open CV] The overall conversion of the total of the Dell ExpressACTIVetrpACTIONERIAL US>Directed to the last time. https…blog.naver.com[OpenCV][C++]Geometric Transform General Theorem – warpAffine, warpPerspective transformation Last time I learned about video rotation, I briefly learned how to use the warpAffine() function. https…blog.naver.comcv::Mat src = cv::imread(“../../images/Road2.png”, cv::IMREAD_COLOR);cv::ポイント 2f srcPt[4]; srcPt[0] = cv:point 2:point 2f(4,20205); srcPt[1] = cv:point 2:point 2f(562,208); srcPt[2] = cv:point 2f (11, 408);srcPt [3] = cv:point 2:point 2f (138, 403);cv:point 2fdstPt [4]; dstPt[0] = cv:point 2f (10, 10); dstPt[1] = cv:point 2f(70, 10); dstPt[2] = cv:point 2f(10, 90); dstPt[3] = = cv::ポイント2f(70、90);cv::Matsrc_warp;cv::Mat perspectiveMat = cv::getPerspectiveTransform(srcPt, dstPt); cv::warpPerspective(src, src_mat, cv::Size(80, 80));This is the result of converting only the original video and the center lower part of the video into a Bird Eye View.Let’s extract the channel from this bird’s eye diagram.Color can find a channel that you can find a channel (imgproc.hpp is an eight bit video input.After converting into the grayWe will try to play in Gray video. https://m.blog.naver.com/dorergiverny/223118426244[OpenCV][C++]General theorem of edge detection methods – We learned about edge detection (edge enhancement, sharpening) by primary and secondary differentiation before cannyedge detection line detection. https://m….blog.naver.com[OpenCV][C++]General theorem of edge detection methods – We learned about edge detection (edge enhancement, sharpening) by primary and secondary differentiation before cannyedge detection line detection. https://m….blog.naver.comcv::Mat src_gray;cvtColor(src_warp, src_gray, cv::COLOR_BGR2GRAY);cv::Mat src_edge;cv::キャニー (src_gray, src_edge, 170, 220);Canny Edge has been extracted as follows. I warped, so the lanes look parallel.Use HoughLinesP() to locate the line segment.std::cv<cv::Vec4i> 行;cv::HoughLinesP(src_edge, lines, 1, CV_PI / 180, 50, 30, 20); (const auto&l : lines) {cv::line(src_warp, cv::Point(l[0], l[1])}、 cv::Point(l[2], l[3])、 cv:Scalar(0, 255)、1, 8);} 用The results of finding the line segment are as follows.If you reversely transform these lines and paste them into the original image, the following results will be obtained. In this case, we used the perspective transform() function to project only the coordinates instead of performing perspective transform.If you reversely transform these lines and paste them into the original image, the following results will be obtained. In this case, we used the perspective transform() function to project only the coordinates instead of performing perspective transform.cv::Mat spearsMat_inv = cv::getPerspectiveTransform(dstPt, srcPt);std::vector<cv::ポイント 2f> stPt1、endPt1;std::ベクトル<cv::ポイント 2f> stPt2、endPt2; (const auto&l: lines) {tPt1.emplace_back(l[0], l[1]);ndPt1.emplace_back(l[2], l[3]) の場合;}cv::perspectiveTransform(stPt1, stPt2, perspectMat_inv); cv::perspectiveTransform(endPt1, endPt2, spapMat_inv); (inti = 0; i < stPt1.size(); ++i) {cv::line(src, stPt2[i], cv:Scalar(0, 255), 2, 2, 8)cv::Mat spearsMat_inv = cv::getPerspectiveTransform(dstPt, srcPt);std::vector<cv::ポイント 2f> stPt1、endPt1;std::ベクトル<cv::ポイント 2f> stPt2、endPt2; (const auto&l: lines) {tPt1.emplace_back(l[0], l[1]);ndPt1.emplace_back(l[2], l[3]) の場合;}cv::perspectiveTransform(stPt1, stPt2, perspectMat_inv); cv::perspectiveTransform(endPt1, endPt2, spapMat_inv); (inti = 0; i < stPt1.size(); ++i) {cv::line(src, stPt2[i], cv:Scalar(0, 255), 2, 2, 8)